Ryan Jensen, Cameron Earle and Dr. Brent Adams, Industrial Design
3D imagery is used to enhance traditional film footage in all areas of the film and video industry. In order to be prepared for industry, it is necessary for students to be familiar with the process of putting live and computer generated images together in a believable fashion. Because of the recent beginning of the Animation majors at BYU, this technique has not been sufficiently taught to students. We were able to learn and use this technique in our research. We hope to be able to use our findings and experiences to teach others in the animation programs. BYU possesses the hardware and software necessary to use this technique, but this equipment is sorely underused. We hope to increase desire among students to use program equipment, and to create footage mixing both live and computer generated images.
We had to create both the computer generated elements and the film footage. We decided to composite computer generated shoes onto footage of a camera pan of an actual closet.
The first step was to create shoes in 3D. Using methods taught in the BYU animation program, I created the models in AliasWavefront’s Maya software (fig.1).

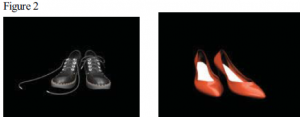
Once the models were created, we decided to shoot the footage (Fig 2). The footage had to be shot as if the shoes were actually in the scene. This is the part of the process where Cameron helped me. We used a Canon XL1 miniDV camera, similar to the one owned by BYU’s Industrial Design department. For lighting, we used a mini tungsten lighting kit owned by BYU’s Center For instructional Design. In order to get a smooth pan, we placed a board on the carpet in front of the closet, and rolled the camera down the board on a skateboard.
I used information from the footage to texture and light the 3D models. Texturing a 3D model is the process of creating color, shininess, reflectivity, bumpiness etc. on the model. Lighting means shining computer generated lights on the computer generated objects. The lights in the computer had to mimic the lights that were shinning on the actual closet in placement, direction, color and intensity in order to make the shoes look like they are actually in the closet

I then had to make a 3D camera move in unison in comparison to the way that the real camera was moved when taking the actual footage. I used a plug-in to Maya called MayaLive. In MayaLive, it is necessary to select areas in the footage that the can be tracked in all or most of the frames. It is best to use intersections of dark and light, and points of high contrast. Once a sufficient number of points are tracked, MayaLive can then determine how the real camera moved, and mimic that movement for a camera used in the 3D program. It will also show where the 3D elements should be placed in relation to the 3D camera in order to make them appear in the right places when placed on top of the 3D footage. This 3D camera was then used to render (film) the lighted and textured 3D models. These images of the 3D footage were then placed on top of the actual footage of the closet.
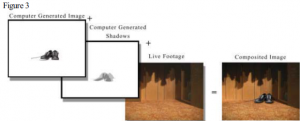
It was also necessary to create shadows for the 3D objects in order to make them look like they were a part of the actual footage. In order to do this, the back wall and floor of the real footage had to be mimicked in 3D. The shadows were then cast onto this geometry and rendered (or filmed) as a separate shadow layer. The layers were then composited together to make the computer generated shoes and the live footage fit together realistically. Figure 3 shows how the layers are composited to create footage with both real and 3D elements. The camera pan with 3D shoes composited in can be accessed from the web at www.monsoon-media.com/orca.

