David Segrera and Dr. Tracy Nelson, Mechanical Engineering
Industrial need for a high-strength, ferritic steel exhibiting desirable weldability, malleability, and corrosion resistance properties has led to the development of high strength, low alloy (HSLA) X-65 Steel. This class of steel uses small amounts of alloying material and very little carbon to make it more corrosion resistant than normal carbon-containing steels. As HSLA has gained popularity in automotive, naval, and other industries, the inherent need for better welding processes has arisen.
In 1991, in an effort to create a better welding alternative, The Welding Institute (TWI) developed a process known as Friction Stir Welding (FSW). The solid-state FSW method produces lower peak temperatures than traditional arc welding. This new joining technology significantly reduced the detrimental effects in the microstructure of the welded metal and surrounding heat-affected zone (HAZ). As a solid-state process, FSW uses no sacrificial filler material and exhibits no solidification defects, ultimately producing stronger welds than those achieved by conventional welding processes.
The post-weld properties attained in friction-stir-welded metals are specific to the material and require examination on a case-by-case basis. For industry to use FSW on X-65 Steels, consistent weld procedures need to be established and post-friction-stir-welded properties explored.
In response to the need for X-65 weldability data, original research has been conducted at Brigham Young University’s Friction Stir Research Laboratory to examine the feasibility of friction stir welding of X-65 Steel. The first year of this study explored post-weld microstructural, microhardness, tensile, and strain properties achieved in X-65 using truncated cone (TC) and step spiral (SS) tools. Both tools showed excellent weld consolidation, surface finish, and post-weld mechanical and microstructural properties. With the process windows established and initial microstructural and mechanical properties characterized, the second year of this study focused on characterizing the weld microstructure, thermal cycles, machine loads, and post-weld mechanical properties. This effort has been conducted as a support to this second year of research to determine the toughness of these welds using Charpy v-notch testing.
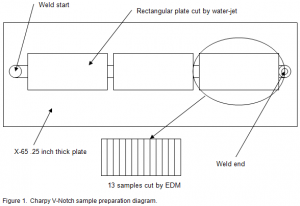
All of the samples were made according to ASTM E23 . Because the welds were conducted on 6.35 mm (0.25 in) thick X-65 plate, the tested Charpy V-notch specimens were sub-size (10 mm x 5 mm cross section instead of the standard 10 mm x10 mm cross section) according to ASTM E23. After the welds were run, three rectangular pieces were water-jet cut from each weld to begin the sample preparation (see Figure 1). The rectangular plates were machined square and the top and bottom faces were surface-ground while maintaining a datum edge along the bottom of each rectangular plate. The plates were divided into 13 individual specimens by wire EDM. The specimens were finish-ground to the cross-sectional dimensions provided by ASTM E23.

To locate the notch of the specimen, the first and last samples from each weld were ground using a succession of 600, 800, and 1200 grit wheels and polished on a six micron diamond pad. Once these specimens were polished, an automatic microhardness tester was used to determine the hardness profile across the polished surface. Three different notch locations were selected. The advancing side HAZ notch location was selected as the region with the largest vertical HAZ patch, the “hard notch” location was placed in the hardest location in the weld nugget, and the center notch was located at the weld center. To ensure that the rectangular plates were cut perpendicular to the weld centerline, the hardness profile maps for the first and last samples were compared (see Figure 2).

After all of the hardness profiles were obtained, the notch locations for the regions of interest were compiled for each weld (see Table 1). Notches for all of the specimens were machined using a double-angle HSS milling cutter.

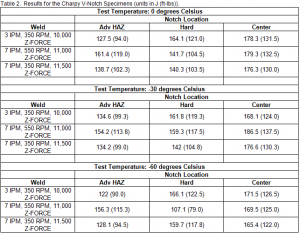
As previously mentioned ASTM E-23 standards were employed for sample preparation and testing. MSI Testing Inc., located in Salt Lake City, Utah, conducted the Charpy impact testing. Average values for the three weld parameter sets are found in Table 2.
Preliminary results suggest an increase in weld center toughness and a slight decrease in toughness in the HAZ relative to the base metal (see figure 3). The weld center exhibits an increase in toughness due to the significant grain refinement associated with FSW. Despite the grain refinement, there is not a significant increase in hardness (
This study is an excellent starting point for understanding the material properties of friction stir welded X-65. When coupled with additional data conducted by other researchers at Brigham Young University’s Friction Stir Research Lab it will help characterize the process and bring this technology closer to industry application.

