Devin Athey and Dr. Randy Lewis, Chemical Engineering
Main Text
This project focused on the design of electrical components for a low-cost, low-speed wind turbine in Peru. The electrical components include the charge controller and the three-phase AC rectifier. These parts, if purchased from retailers, cost $100 and $30 USD respectively. The wind turbine was proposed for low-income residents of villages that are not located near power grids. The focus village was located on Lake Titicaca, Peru. Each family in this village has a monthly income of just under $30 USD. Their current source of electricity comes from solar panels that cost upwards of $1200 USD. In order for a village to purchase a solar panel, they must sign a five-year loan. The purpose of this project was to reduce the costs of the electrical parts in order to make a wind turbine a more affordable option. Building the electrical parts at a reduced cost was part of a broader project to build a small wind turbine.
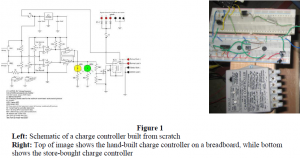
The main component of the project was to reduce the cost of the wind turbine by building a charge controller. Using different designs found on various “do it yourself” websites1 we2 constructed a charge controller that mimicked the store-purchased charge controller (figure 1). The total cost of the initial unit was $35 USD. This cost was higher than anticipated due to the purchasing of most of the parts from Radio Shack, even though used parts were available within the Electrical Engineering Department at BYU. However, after testing, we found that the charge controller worked successfully and would safely keep the battery from overcharging.
The second component of the project was building a three-phase rectifier for less than $30 USD (the current price of a store-bought rectifier). We found this could be built for $5-10 USD depending on where the parts were purchased. In our studies, we also found the alternator itself to have a built-in three-phase rectifier, which could be used if the distances between the alternator and the battery were short.
Both the charge controller and the rectifier were built together on the same circuit, allowing for easy storage and simple connections. Because the charge controller has multiple inputs/outputs, it was necessary to use a plug-connection that would easily connect the correct wires together. A simple plastic container was then used to keep the circuit protected, but easily accessible.
The project culminated with a trip to Puno, Peru, and eventually the Islands of the Uros during May 2010. There we learned new insights regarding the installation of the wind turbine and where the turbine could go in the future. After visiting the Islands, we learned that the wind turbine installed in 2009 (with no optimized electrical parts) was not in use as it was too dangerous to keep up during storms (there was no way to anchor the windmill to anything as they live on floating reed islands and there was the potential for increased lightning strikes). However, a local contact who is an engineer responsible for Lake Titicaca proposed that we build the wind turbine by his community outreach center, right on the bay of Lake Titicaca.
We were able to construct a frame out of wooden poles, and attach the wind turbine with the accompanying electrical components. During construction, there were multiple residents of Puno that asked what it was we were building, and how it would be possible for them to build one. We learned that there are multiple villages all over the shores of the lake that do not have electricity, but have sustainable wind. Installation at the community outreach center will provide an opportunity for the local engineer to demonstrate the wind turbine and to work on further optimization. Currently, the alternator of the wind turbine still needs to be reduced in cost to make the wind turbine more sustainable. The current cost for the entire wind turbine is approximately $400 but this is still expensive for the local villagers.
We also learned that when transporting the circuit on Peruvian roads, it appears that the circuit was damaged. Our circuit had one broken connection within the wire that we were not able to fix during our short visit there. One of the ways that we could have prevented that would have been to completely seal the circuitry. However, this would have also prevented anyone from replacing any broken parts.
Even though the circuit was damaged in Peru, we had multiple tests using the wind tunnel at BYU that demonstrated the success of the circuitry. Since the circuit was damaged, we were able to use a store-bought charge controller on the wind turbine in Puno, allowing the local engineer to demonstrate the wind turbine to the residents of Puno and teach them how to build their own. We also wrote a manual that described in detail how the wind turbine worked, as well as each individual component. As an appendix, a manual on how to build each individual part was included.

References
- Davis, Michael. “Wind Turbines Made Simple”. Greenjoyment. September 6, 2009.
<http://www.greenjoyment.com/wind_turbines_made_simple_how_to_build_your_own_electricity.html> - Team members included Megan Fuller (Electrical Engineering), Jon Terry (Chemical Engineering), and David Williams (Mechanical Engineering)
